
While our Magento packages deliver the best value/performance you will find anywhere on the planet there is one tool that will speed up your website load times even further: Varnish.
One of the key selling points of Magento 2 from the early hype was that not only will all versions come with a Full Page Cache (in Magento 1 this was only available to Enterprise versions) the FPC could be configured to support Varnish.
Varnish is a HTTP accelerator designed for content-heavy dynamic web sites as well as APIs and was designed from the outset as an HTTP accelerator.
When fully configured Vanish replaces the Full Page Cache on Magento 2.
To use Varnish with Magento 1 it was necessary to install a 3rd party extension (usually the Turpentine extension), however, this time everything is built in. By default Magento 2 will use file based Full Page Cache (/var/page_cache) though this can also be set to use redis for an in-ram cache. However, both are significantly slower than Varnish.
Plesk provides all the tools needed to configure varnish with a few easy steps. You will need full administrator access to Plesk and sudo level ssh access to your web server. A standard Plesk user will not work.
When fully configured Nginx will receive all traffic.. decode the ssl.. then pass the traffic to varnish. If the required page is cached it will be handed directly to the browser. If not it will be requested from apache / php and the page will be built as it normally would.
There are a few steps to this as shown below.
Of course if you are a Dx3webs customer you can simply raise a ticket saying “please configure our site for varnish” and we will take care of the rest.
For anyone else here we go….
If you have not already, install the Docker extension for Plesk
Log into Plesk as an Administrator. If you have sudo access to the server you can generate a one time log in link with
plesk login
Select Extensions from the left hand menu and search for “docker”

Click install on the next screen (you do not need to purchase the additional services)
When installed you will see a new entry “Docker” on the left hand menu.
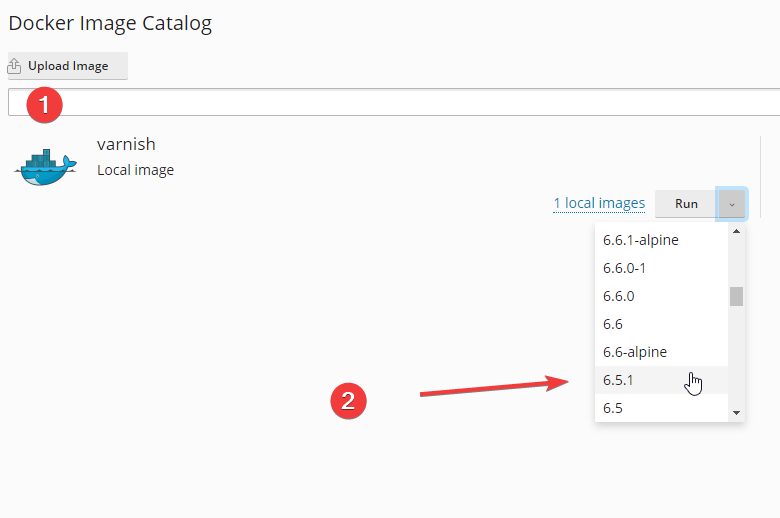
You now have access to hundreds of docker images. This is a powerful feature but for now we want to install a single Varnish container.
Install the correct varnish docker container for your version of Magento
One of the new challenges of Magento 2 is that each sub version comes with its own preferred version of tools eg redis / varnish / elastic search / database etc. While it is great that they are incrementing the software stack with increments in Magento versions this makes it very important that devs inform hosts what version is required at any point in time. Fortunately, Adobe have provided a master list here : System requirements
Find your current Magento version. Either by logging into your admin and checking the footer:

Or using the following command on the CLI:
/opt/plesk/php/7.4/bin/php bin/magento -V
Then check this against the System Requirements list to get the version of Varnish you need. In the case of our example Varnish 7.. but for this reason we are going to use 6.5 (there is no down side here)
Select the Docker tab from the left hand menu and search for Varnish and select the official Varnish docker image. Then from the drop down select the latest sub-version for the version you require. In our case we are going for 6.5.1
This will take you to the configuration screen where we need to make a few changes.
Give the container a sensible name eg varnish-live / varnish-stage / varnish-dev. You can have as many containers as your ram will support.
Tick :Automatic start after system reboot
Untick :Automatic port mapping
and set the ports to free ports eg 32780 / 32781 (increment for each varnish instance.. obviously they cant share ports)
In volume mapping, set “Container” to /etc/varnish and “Host” to /etc/varnish-live (or wherever you intend to store your default.vcl see below)
Finally, set the variable VARNISH_SIZE to a sensible level for your server / site.
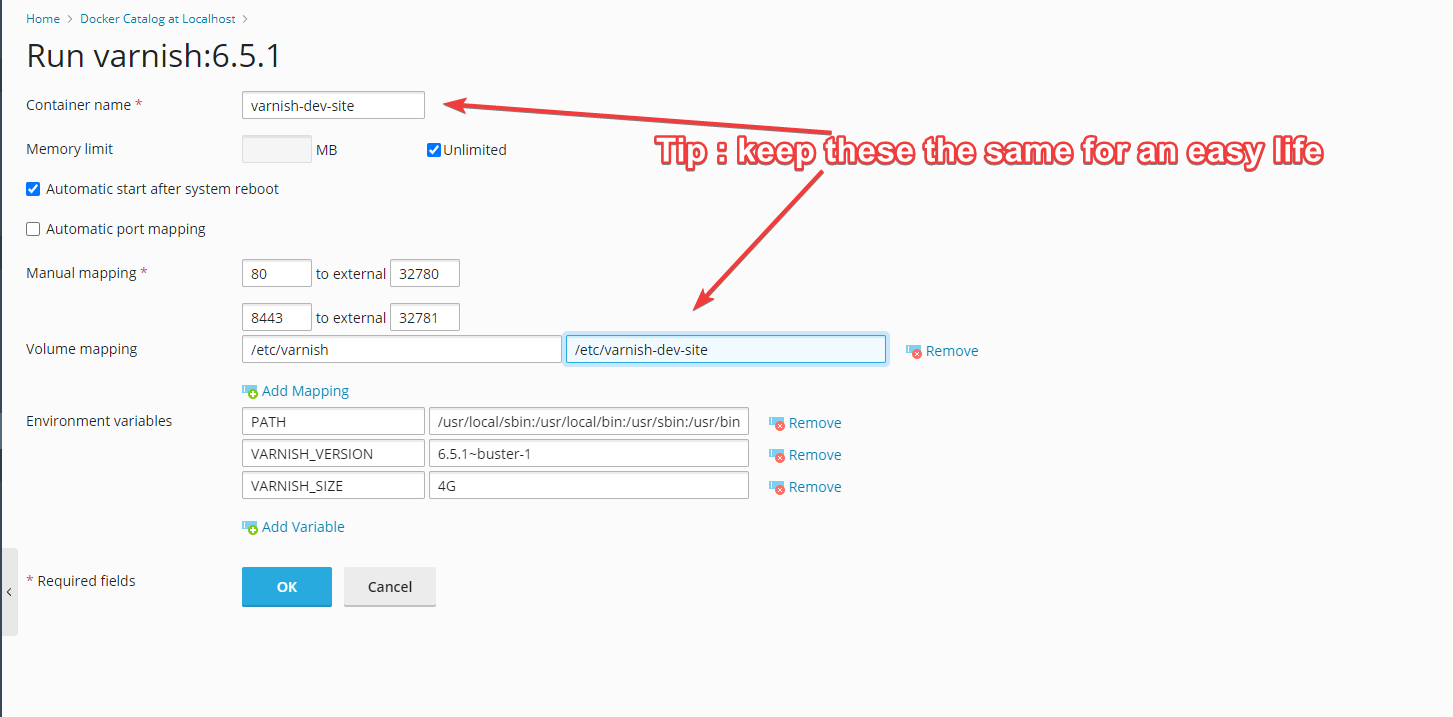
Do not press OK yet.
Create your varnish config folder
You need to store your varnish configuration file on your server. If you were installing varnish as a local service (rather than docker) this would be /etc/varnish/default.vcl.
One of the most powerful features of docker is the ability to host files on your server while managed from the container. As we did in the previous step we are going to map the containers folder : /etc/varnish/ to /etc/varnish-something on the host eg /etc/varnish-live. To make life easier we recommend you name this the same as the Container Name. From the CLI create this folder
mkdir /etc/varnish-dev-site
Export default.vcl from Magento
From the command line run
/opt/plesk/php/7.4/bin/php bin/magento varnish:vcl:generate --export-version=6 --output-file=/etc/varnish-dev-site/default.vcl
This will export the default varnish vcl file to our config directory. Replace /etc/varnish-dev-site with the folder you have created earlier
Edit varnish.vcl
Using your preferred editor (Vi of course) open your file for editing. You will see the following at the top
# VCL version 5.0 is not supported so it should be 4.0 even though actually used Varnish version is 6vcl 4.0;

import std;
# The minimal Varnish version is 6.0
# For SSL offloading, pass the following header in your proxy server or load balancer: 'SSL-OFFLOADED: https'

backend default {
.host = "localhost";
.port = "8080";
.first_byte_timeout = 600s;
.probe = {
.url = "/pub/health_check.php";
.timeout = 2s;
.interval = 5s;
.window = 10;
.threshold = 5;
}
}

acl purge {
"localhost";
}
Change this as shown replacing the port and your server’s IP address like (and remove the .probe section) so:
# VCL version 5.0 is not supported so it should be 4.0 even though actually used Varnish version is 6vcl 4.0;

import std;
# The minimal Varnish version is 6.0
# For SSL offloading, pass the following header in your proxy server or load balancer: 'SSL-OFFLOADED: https'

backend default {
.host = "xxx.xxx.xxx.xxx"; #servers IP address
.port = "7080";   #plesk's apache port
.first_byte_timeout = 600s;
}

acl purge {
"localhost";
"xxx.xxx.xxx.xxx"  #server IP address
}
You can now go back to Plesk / Docker page and press OK (or restart the container)
The docker container is now running and using the default.vcl we have just created.
Configure the domain
We are almost there. Go to your domain page on Plesk and edit Hosting settings
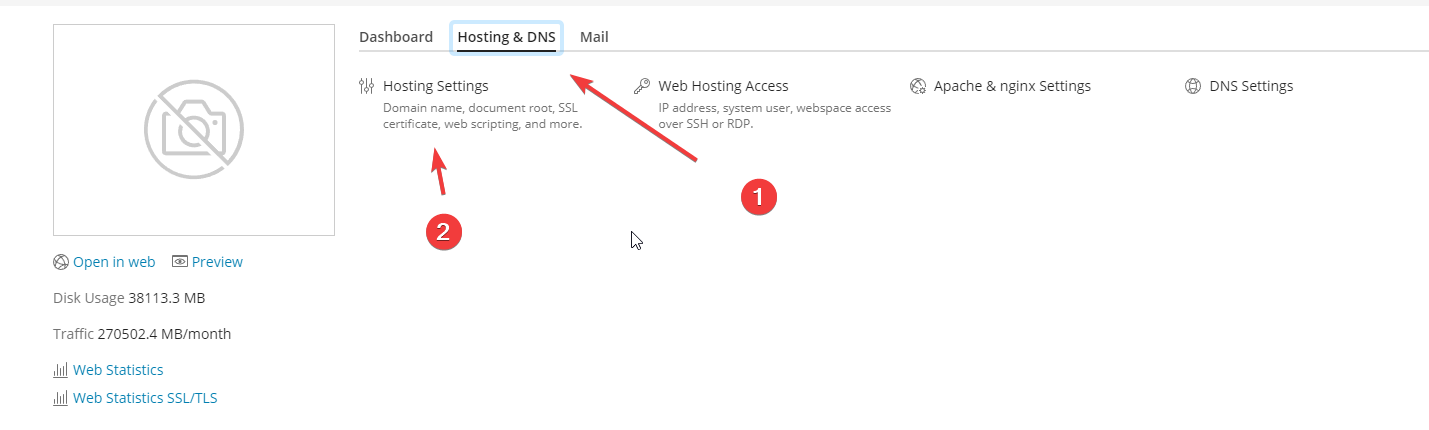
Make sure:
Is OFF otherwise you will end up in a redirect loop. Of course, this is no good at all as we must keep traffic on https so next click:
Apache and nginx Settings
SetEnvIf X-Forwarded-Proto "https" HTTPS=on

Header append Vary: X-Forwarded-Proto

<IfModule mod_rewrite.c>

RewriteEngine on

RewriteCond %{HTTPS} !=on

RewriteCond %{HTTP:X-Forwarded-Proto} !https [NC]


RewriteRule ^ https://%{HTTP_HOST}%{REQUEST_URI} [L,R=301]
to both
Additional Apache directives
Now we are ready to activate varnish
Go back to your Plesk domain page and select Docker Proxy Rules
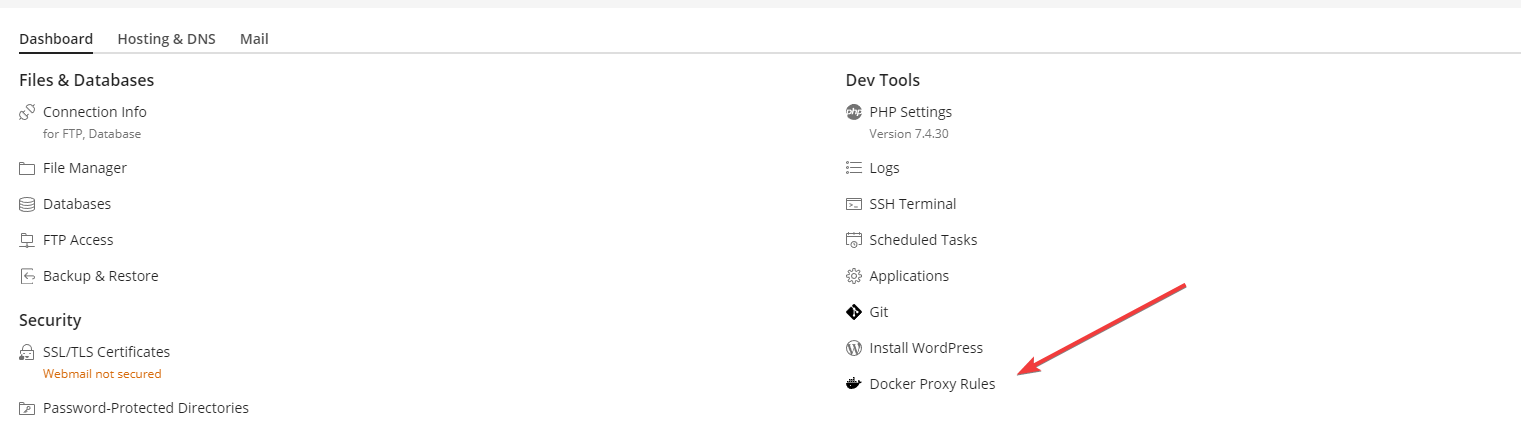
From the dropdown menu select the Varnish contain we have just created. Immediately all traffic to your site will be routed through Varnish. However, at this point Magento will not use this as a full page cache. We need one more step.
Firewall config
This will depend on how you manage your firewall.
If you are using CSF you can run
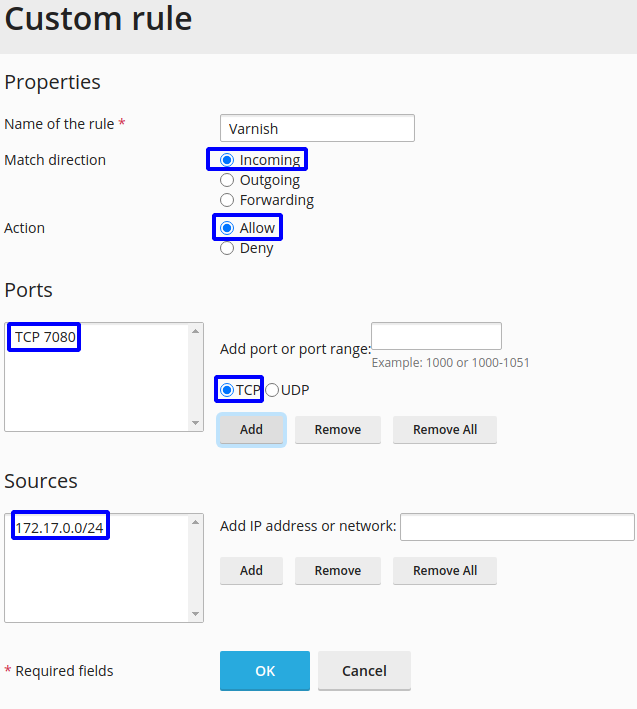
csf -a 172.17.0.0/24
Or simply IPTABLES
iptables -I INPUT -p tcp --dport 7080 -s 172.17.0.0/24 -j ACCEPT
if you are using the plesk firewall extension you can add a similar rule there also.
Activate Varnish
/opt/plesk/php/7.4/bin/php bin/magento config:set --scope=default --scope-code=0 system/full_page_cache/caching_application 2
Alternatively, in Magento admin
Stores > Configure > Advanced > System > Full Page Cache : Varnish Cache (recommended)
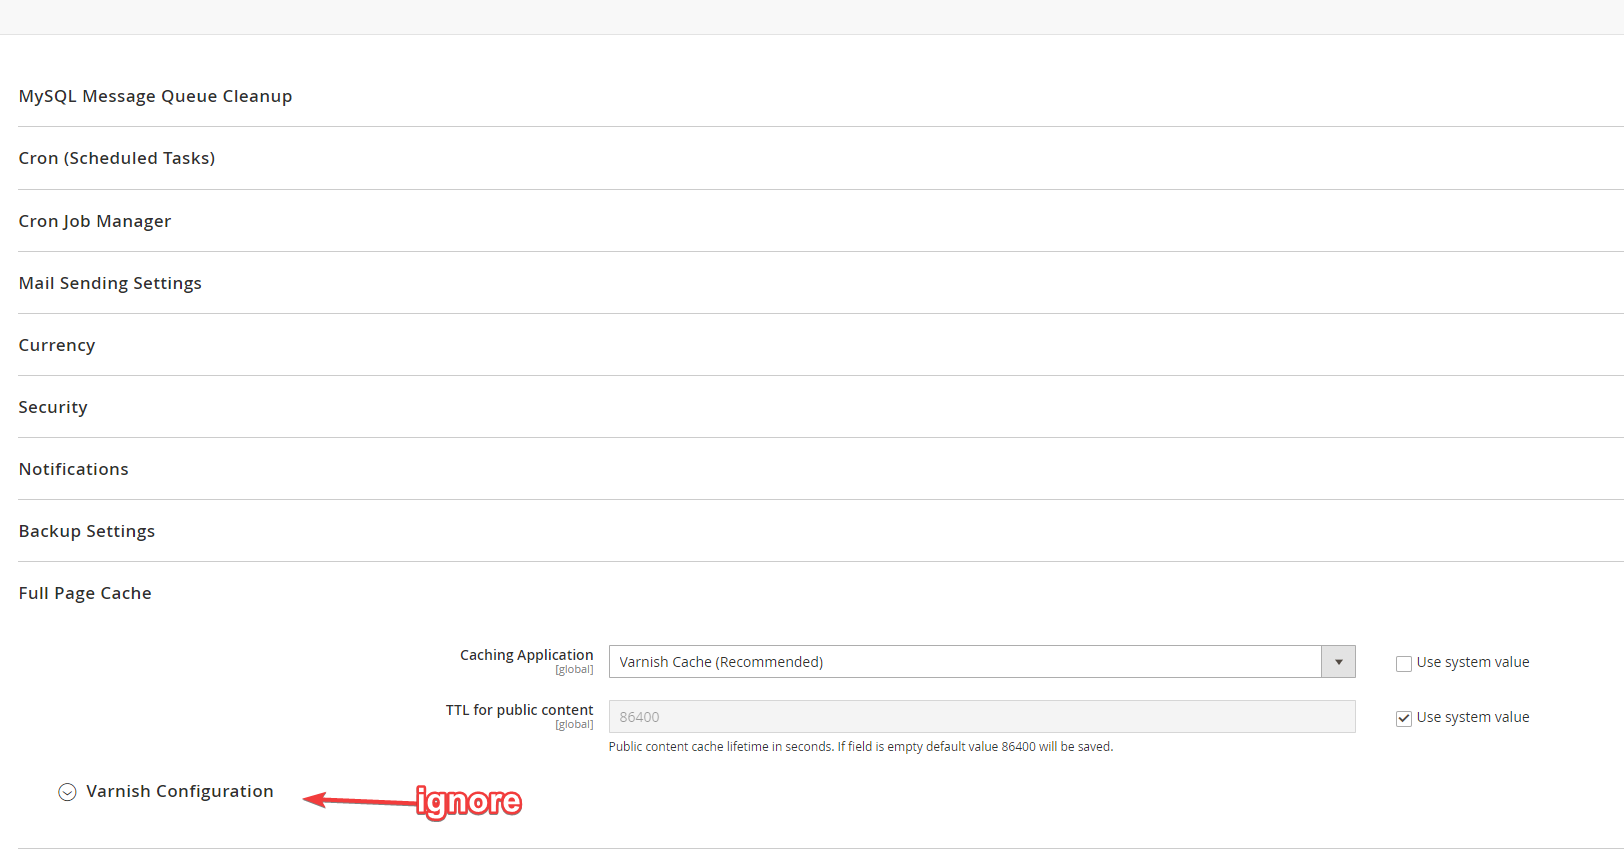
(you can ignore the Varnish configuration drop down, this does not actually do anything unless you are generating a VCL which we have already done)
Now Magento will use Varnish as its FPC.
Checking varnish
We need to actually check if this is working.
Method 1
The easiest way to do this is to use varnishstat tool. So we need to log into the docker container.
From the CLI run
sudo docker ps
To get a list of all containers running on your server. Copy the container id (xxxxxxxxxxxx ) then run
sudo docker exec -it xxxxxxxxxxxx bash
you are now logged into the docker container. Enter
varnishstat
and you will see a lit of live stats from your varnish container
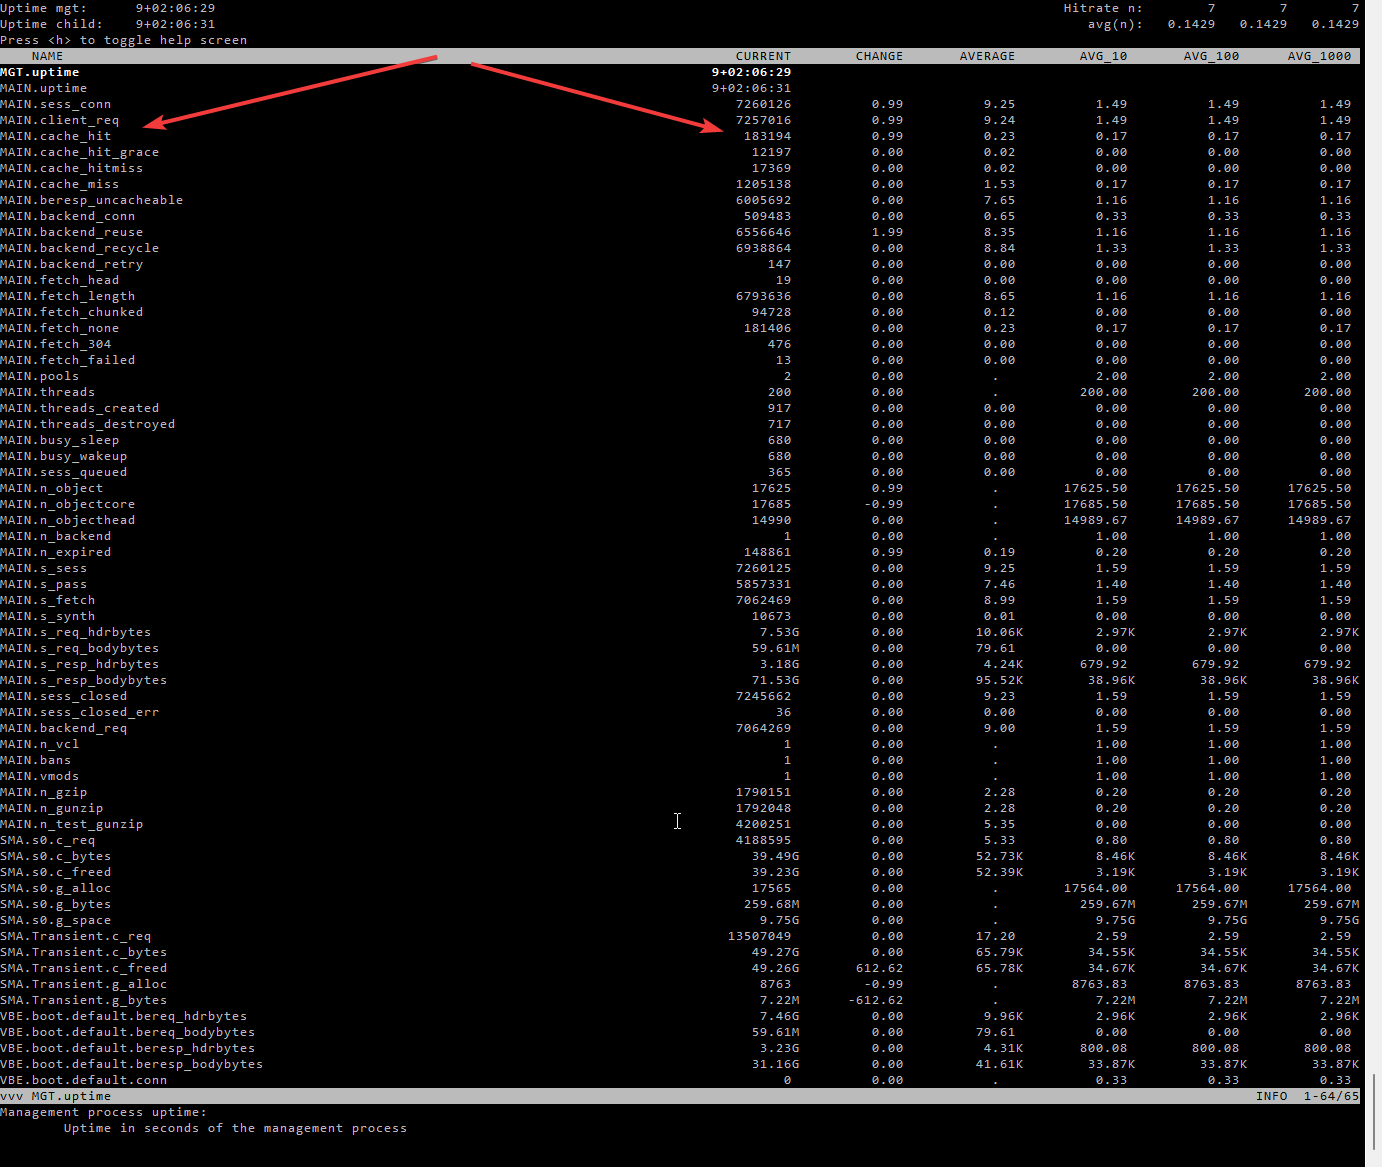
We are interested in
MAIN.cache.hit
this should increment every time you reload a web page. If it does not something has gone wrong
Method 2
The ttfb of your site should drop drastically from its original value down to around 40ms. You can use the Inspect tool of your web browser (network tab) to check this time.
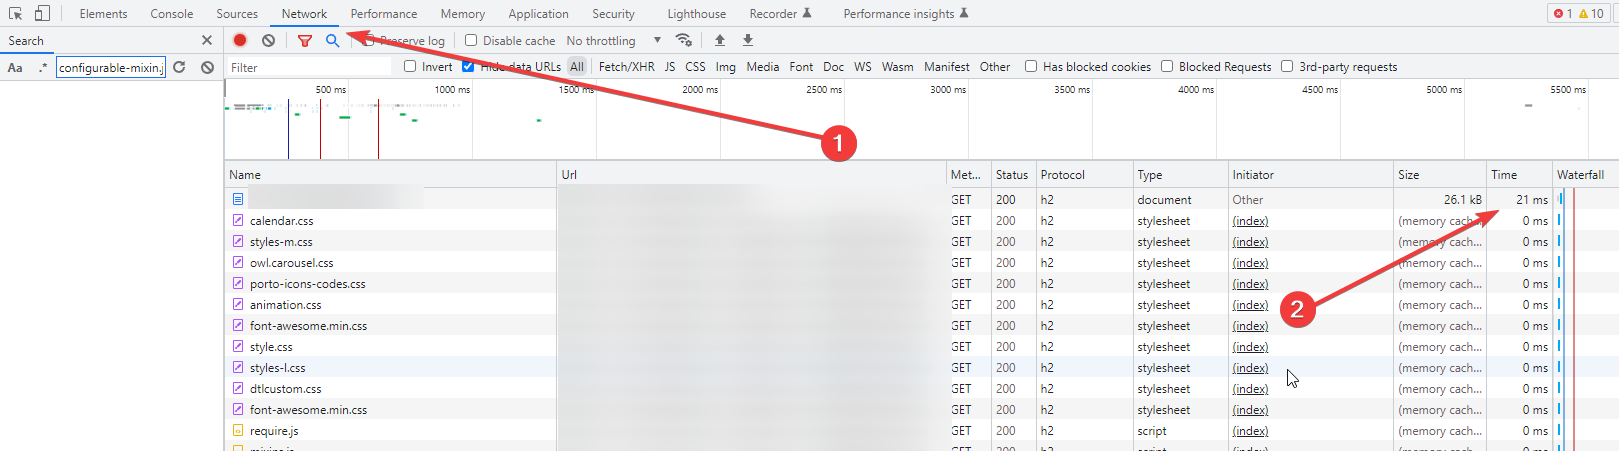
As above, if this is not the case something has gone wrong.
Now you need to test your site and make sure that all is well. There are potential issues with the extensions you have installed. Make certain that logged in and logged out customers can place orders etc.